LinearLayout 정의 및 사용법

목차

  1. LinearLayout의 특성
  2. layout gravity
  3. gravity

1. LinearLayout이란 무엇이고 어떻게 사용할까?

LinearLayout이란 가장 간단하면서 유용하게 쓰이는 레이아웃입니다.
대표적인 기능은 텍스트, 버튼같은 뷰를 단순히 가로나 세로 순서대로 배치할 때 자주 사용됩니다.

처음 사용할때 리니어 레이아웃에는 반드시 최소 3가지 조건을 명시해주어야  합니다.

1. 높이
2. 너비
3. 배치의 방향 (세로, 가로)


위 사진을 보면

android:orientation 에서 vertical로  설정해서 추가된 3개의 버튼이 수직으로 하나씩 배치가 된것을 볼수 있습니다. 가로로 설정하고 싶다면 vertical 대신 horizontal을 설정하면 됩니다.

android:layout_width, android:layout_height를 통해서 레이아웃의 크기를 설정할 수 있습니다.
match_parent는 자신보단 상위의 레이아웃에 맞게 크기를 조절한다는 뜻입니다. 여기서 더 상위 레이아웃은 없으니 자동으로 기기의 화면에 맞게 조절됩니다.

*버튼이 차지하는 영역
사진에서는 단순히 세로만 배치하기 때문에 버튼하나가 각각 색칠된 부분 전체를 차지한다고 생각하시면됩니다.


2. layout gravity


layout gravity 사용이유

: 뷰의 위치 정렬 기준을 정하기 위해서 사용합니다( 왼쪽, 가운데, 오른쪽 등)

layout gravity 사용법 & 예


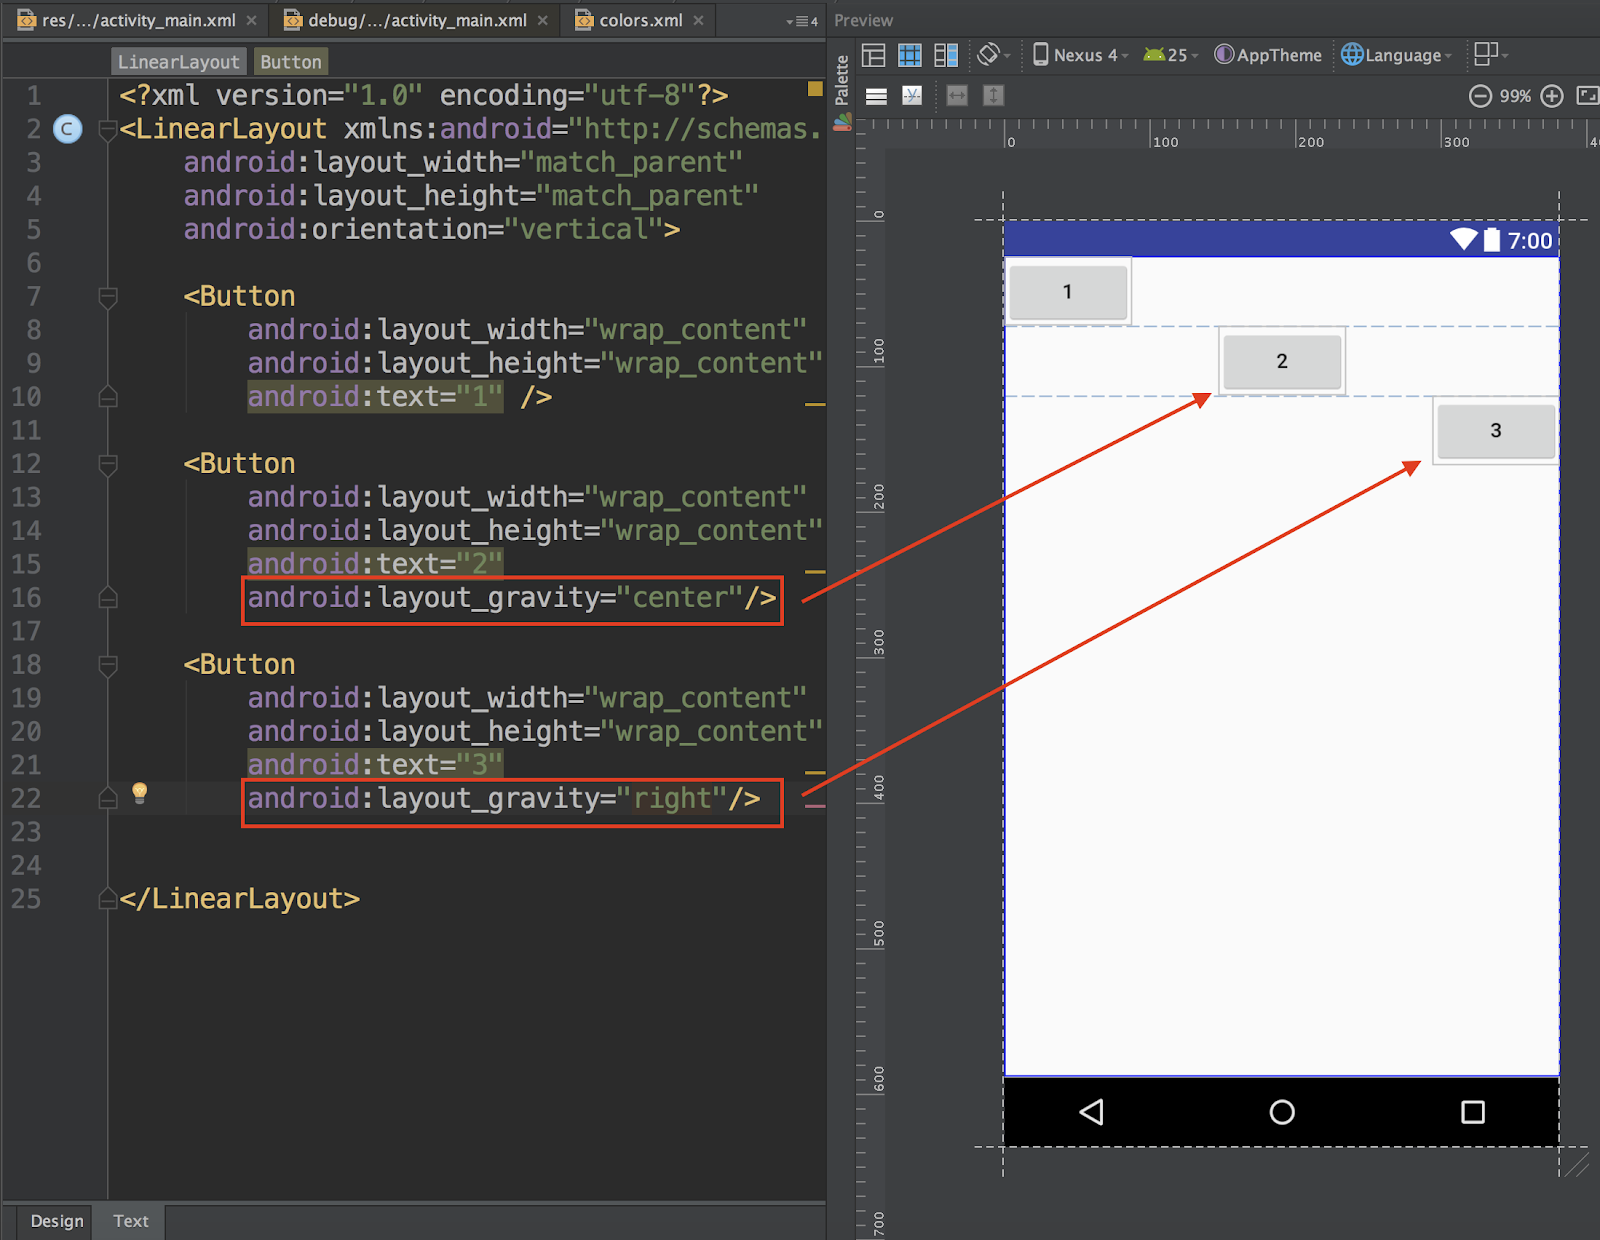
위 사진처럼 layout_gravity를 설정하기 위해선
android:layout_gravity 특성을 사용하시면됩니다. 이를 사용하면 뷰(버튼)가 차지하는 영역에서 정렬기준이 뀌게 됩니다.
정렬은 좌,우,중앙 만이 아니라 여러가지가 있으니 필요하다면 검색해서 알아보시기바랍니다.
정렬기준이 정해져있지 않다면 기본적으로 뷰는 왼쪽정렬이 됩니다.


3. gravity

 layout gravity와 gravity는 엄연한 차이가 있으니 주의해주세요

gravity 사용이유

: 뷰 내부의 요소들의 정렬기준을 정할 때 주로 사용합니다.

gravity 사용법 & 예시


gravity는 뷰 자체가 아니라 뷰안의 내용들의 정렬기준을 정하기 때문에 위와 같이 버튼안의 숫자들의 정렬이 바뀌게 됩니다.
android:gravity를 사용해서 설정이 가능합니다.
gravity또한 layout_gravity와 마찬가지로 여러가지 정렬기준이있습니다.

Toast & Snackbar

토스트메세지

 정의

일반적으로 어떤 알림을 주기위해서 화면의 하단에 잠깐 보였다가 사라지는게 토스트메세지입니다.


여기서는 토스트메세지의 기본보다는 좀더 심화방법에 대해서 다루어 보겠습니다.


1.토스트 메세지의 위치설정 

예시 코드를 통해서 설명하도록 하겠습니다.

1
2
3
4
5
6
Toast toast=Toast.makeText(getApplicationContext(),"위치가 바뀐 토스트",Toast.LENGTH_LONG);
//기본적인 토스트 메세지를 만들어줍니다.
toast.setGravity(Gravity.TOP|Gravity.LEFT,200,200);
//setGravity( 처음 기준점, x축 offset, y축 offset)을 사용하여 위치조정
toast.show();
//
cs


2. 토스트 메세지의 모양설정


토스트 메세지의 모양은 기본적으로 toast.setView(View)를 통해서 설정할 수 있습니다.
여기선 shapeDrawable을 통해서 TextView의 모양을 만들고 이 TextView를 포함한 레이앙를 토스트에 설정해서 토스트메세지로 TextView가 출력되도록 하겠습니다.

우선 textView를 넣어둘 toastborder.xml파일입니다.

1
2
3
4
5
6
7
8
9
10
11
12
13
14
<?xml version="1.0" encoding="utf-8"?>
<LinearLayout xmlns:android="http://schemas.android.com/apk/res/android"
    android:orientation="horizontal" android:layout_width="match_parent"
    android:layout_height="match_parent"
    android:id="@+id/toast_layout_root">
    <TextView
        android:id="@+id/text"
        android:layout_width="wrap_content"
        android:layout_height="wrap_content"
        android:padding="20dp"
        android:textSize="40dp"
        android:background="@drawable/toast"/>
<!--이 배경은 커스터마이징한겁니다-->
 
</LinearLayout>
cs


우리는 이안에 있는 TextView를 토스트로 출력해볼겁니다.

1
2
3
4
5
6
7
8
9
10
11
12
13
14
15
16
17
LayoutInflater inflater=getLayoutInflater();
    //여기선 R.layout에 toastborder.xml파일을 만들고 그 안에 TextView를 만들어 줍니다
 
    View layout=inflater.inflate(R.layout.toastborder,(ViewGroup)findViewById(R.id.toast_layout_root));
    //layoutInflater : xml로 정의된 resource들을 view의 형태로 반환해줌
    TextView textView=(TextView)layout.findViewById(R.id.text);
    //반환된 레이아웃에서 해당 텍스트를 가져옵니다.
    textView.setText("모양을 바꾼 토스트입니다");
    //텍스트의 글자를 설정합니다.
    Toast toast=new Toast(getApplicationContext());
    //토스트를 출력할 context를 설정합니다.
    toast.setGravity(Gravity.CENTER,0,-100);
    toast.setDuration(Toast.LENGTH_LONG);
    //토스트의 여러 특성을 설정합니다.
    toast.setView(layout);
    //토스트의 뷰를 우리가 뽑았던 레이아웃으로 설정합니다.
    toast.show();
cs


스낵바

정의

스낵바 또한 알림을 위해 사용되는 메세지 출력입니다. 그러나 그 기본형태는 토스트와 다르게 아래에서 올라오듯이 출력되며, 출력 유지, 시간 등 토스트보다 세부사항이 설정가능합니다.

주의: 스낵바를 사용하기위해선 Project struture , Dependency에서 design라이브러리를 등록해야합니다.


예제: 버튼을 클릭하면 스낵바가 출력되도록하는 코드입니다.
1
2
3
4
5
6
7
Button button2=(Button)findViewById(R.id.button4);
        button2.setOnClickListener(new View.OnClickListener() {
            @Override
            public void onClick(View v) {
                Snackbar.make(v,"스낵바입니다",Snackbar.LENGTH_LONG).show();
//만드는형식은 토스트와 아주 유사합니다. 그러나 첫번째 인자로 해당 뷰를 출력해야합니다.
// 그럼 해당 뷰의 parent뷰를 그 뷰를 출력대상으로 설정합니다.
            }
        });
cs


아래는 모두 합한예제 파일입니다.

MainActivity.java

1
2
3
4
5
6
7
8
9
10
11
12
13
14
15
16
17
18
19
20
21
22
23
24
25
26
27
28
29
30
31
32
33
34
35
36
37
38
39
40
41
42
43
44
45
46
47
48
49
50
51
52
53
54
55
package com.jasonlee.ed_with_android_studio;
 
import android.os.Bundle;
import android.support.design.widget.Snackbar;
import android.support.v7.app.AppCompatActivity;
import android.view.Gravity;
import android.view.LayoutInflater;
import android.view.View;
import android.view.ViewGroup;
import android.widget.Button;
import android.widget.TextView;
import android.widget.Toast;
 
public class MainActivity extends AppCompatActivity {
 
    @Override
    protected void onCreate(Bundle savedInstanceState) {
        super.onCreate(savedInstanceState);
        setContentView(R.layout.activity_main);
        Button button=(Button)findViewById(R.id.button2);
        button.setOnClickListener(new View.OnClickListener() {
            @Override
            public void onClick(View v) {
                Toast toast=Toast.makeText(getApplicationContext(),"위치가 바뀐 토스트",Toast.LENGTH_LONG);
                toast.setGravity(Gravity.TOP|Gravity.LEFT,200,200);
                toast.show();
            }
        });
        Button button1=(Button)findViewById(R.id.button3);
        button1.setOnClickListener(new View.OnClickListener() {
            @Override
            public void onClick(View v) {
                LayoutInflater inflater=getLayoutInflater();
                //layoutInflater : xml로 정의된 resource들을 view의 형태로 반환해줌
                View layout=inflater.inflate(R.layout.toastborder,(ViewGroup)findViewById(R.id.toast_layout_root));
                TextView textView=(TextView)layout.findViewById(R.id.text);
                textView.setText("모양을 바꾼 토스트입니다");
                Toast toast=new Toast(getApplicationContext());
                toast.setGravity(Gravity.CENTER,0,-100);
                toast.setDuration(Toast.LENGTH_LONG);
                toast.setView(layout);
                toast.show();
 
            }
        });
        Button button2=(Button)findViewById(R.id.button4);
        button2.setOnClickListener(new View.OnClickListener() {
            @Override
            public void onClick(View v) {
                Snackbar.make(v,"스낵바입니다",Snackbar.LENGTH_LONG).show();
            }
        });
    }
}
 
cs


toast.xml (이건 drawable에 저장합니다.)

1
2
3
4
5
6
7
8
9
10
11
12
13
14
15
16
17
<?xml version="1.0" encoding="utf-8"?>
<shape xmlns:android="http://schemas.android.com/apk/res/android"
    android:shape="rectangle">
    <stroke
        android:width="4dp"
        android:color="#ffffff00"/>
    <solid
        android:color="#ff883300"/>
    <padding
        android:left="20dp"
        android:right="20dp"
        android:top="20dp"
        android:bottom="20dp"
        />
    <corners
        android:radius="15dp"/>
</shape>
cs


table_layout.xml (TextView가 저장된 레이아웃)

1
2
3
4
5
6
7
8
9
10
11
12
13
14
15
16
17
18
19
20
21
22
23
24
25
26
27
28
29
30
31
32
33
34
35
36
37
38
39
40
41
<?xml version="1.0" encoding="utf-8"?>
<TableLayout xmlns:android="http://schemas.android.com/apk/res/android"
    android:layout_width="match_parent" android:layout_height="match_parent"
    android:stretchColumns="0,1,2">
    android:stretchColumns: make assigned colum full
    <TableRow
        android:layout_width="match_parent"
        android:layout_height="wrap_content">
 
        <TextView
            android:text="Name : "
            android:layout_width="wrap_content"
            android:layout_height="wrap_content"
            android:textSize="20dp"
            />
        <EditText
            android:layout_width="wrap_content"
            android:layout_height="wrap_content"
            android:layout_span="2"
            />
 
 
    </TableRow>
    <TableRow
        android:layout_width="wrap_content"
        android:layout_height="wrap_content">
        <Button
            android:layout_width="match_parent"
            android:layout_height="wrap_content"
            android:text="NO"
            android:layout_column="1"
            />
        <Button
            android:layout_width="wrap_content"
            android:layout_height="wrap_content"
            android:text="NO"
            android:layout_column="2"
            />
 
    </TableRow>
</TableLayout>
cs


Activity_main.xml

1
2
3
4
5
6
7
8
9
10
11
12
13
14
15
16
17
18
19
20
21
22
23
24
25
26
27
28
29
30
31
32
33
34
35
36
37
38
39
40
41
42
<?xml version="1.0" encoding="utf-8"?>
<android.support.constraint.ConstraintLayout
 xmlns:android="http://schemas.android.com/apk/res/android"
    xmlns:app="http://schemas.android.com/apk/res-auto"
    xmlns:tools="http://schemas.android.com/tools"
    android:layout_width="match_parent"
    android:layout_height="match_parent">
 
    <Button
        android:id="@+id/button2"
        android:layout_width="wrap_content"
        android:layout_height="wrap_content"
        android:text="토스트 띄우기"
        app:layout_constraintLeft_toLeftOf="parent"
        app:layout_constraintRight_toRightOf="parent"
        app:layout_constraintTop_toTopOf="parent"
        android:layout_marginTop="8dp"
        app:layout_constraintBottom_toBottomOf="parent"
        android:layout_marginBottom="8dp" />
 
    <Button
        android:id="@+id/button3"
        android:layout_width="wrap_content"
        android:layout_height="wrap_content"
        android:text="토스트 모양바꾸기"
        app:layout_constraintLeft_toLeftOf="parent"
        app:layout_constraintRight_toRightOf="parent"
        app:layout_constraintTop_toTopOf="parent"
        android:layout_marginTop="324dp"
        />
 
    <Button
        android:id="@+id/button4"
        android:layout_width="wrap_content"
        android:layout_height="wrap_content"
        android:layout_marginTop="99dp"
        android:text="스낵바띄우기"
        app:layout_constraintLeft_toLeftOf="parent"
        app:layout_constraintRight_toRightOf="parent"
        app:layout_constraintTop_toTopOf="parent" />
</android.support.constraint.ConstraintLayout>
 
cs


Alert 대화 알림상자

설명: 대화알림상자는 흔히 봐왔던 작은 경고창(예, 아니오)를 의미합니다.


이번에는 대화알림상자에서

1. 만드는법
2. 제목, 아이콘 그리고 메세지 내용의 설정
3. 예, 아니오 버튼의 추가와 설정 

에 대해서 설명하겠습니다.

직관성을 위해서 코드에 주석을 달아 한번에 설명합니다.
1
2
3
4
5
6
7
8
9
10
11
12
13
14
15
16
17
18
19
20
21
22
23
24
25
26
27
28
29
30
31
32
33
34
//이 함수는 MainActiyity.java 클래스에 포함된 함수입니다.
//어디에 쓰이는지 알고싶다면 아래의 예시 코드를 참조하시기바랍니다.
public void showMessage(){
        final AlertDialog.Builder builder=new AlertDialog.Builder(this);
        //우선 AlertDialog.Builder를 통해서 알림상자를 만드는 객채를 설정합니다
        builder.setTitle("안내");
        //제목을 설정합니다.
        builder.setMessage("종료하시겠습니까");
        //내용을 설정합니다.
        builder.setIcon(android.R.drawable.ic_dialog_alert);
        //제목에 추가할 아이콘을 추가합니다. 여기서는 기본적으로 제공되는 아이콘을 사용했습니다.
        //이제 부정 버튼을 설정해봅시다.
        builder.setNegativeButton("아니오"new DialogInterface.OnClickListener() {
            //함수의 첫인자는 버튼의 메세지, 두번째는 리스너입니다.
            //여기서 리스너는 DialogInterface 클래스의 것을 사용합니다.
            @Override
            public void onClick(DialogInterface dialog, int which) {
                Snackbar.make(textView,"아니오 버튼이 눌렸습니다.",Snackbar.LENGTH_LONG).show();
                //아니오 버튼이 눌리면 스낵바를 출력합니다.
            }
        });
        //마찬가지로 긍정 버튼을 설정합니다.
        builder.setPositiveButton("예"new DialogInterface.OnClickListener() {
            @Override
            public void onClick(DialogInterface dialog, int which) {
                Snackbar.make(button,"예 버튼이 눌렸습니다.",Snackbar.LENGTH_LONG).show();
            }
        });
        //빌더에서 알림dialog를 새로 생성해줍니다. 빌더는 빌더일뿐 결과 객체가 아닙니다.
        AlertDialog dialog=builder.create();
        //보여주도록합니다.
        dialog.show();
    }
cs

아래는 이를 활용한 예시입니다.

Main_Activity.java

1
2
3
4
5
6
7
8
9
10
11
12
13
14
15
16
17
18
19
20
21
22
23
24
25
26
27
28
29
30
31
32
33
34
35
36
37
38
39
40
41
42
43
44
45
46
47
48
49
package com.jasonlee.ed_with_android_studio;
import android.content.DialogInterface;
import android.os.Bundle;
import android.support.design.widget.Snackbar;
import android.support.v7.app.AlertDialog;
import android.support.v7.app.AppCompatActivity;
import android.view.View;
import android.widget.Button;
import android.widget.TextView;
public class MainActivity extends AppCompatActivity {
    TextView textView;
    Button button;
    @Override
    protected void onCreate(Bundle savedInstanceState) {
        super.onCreate(savedInstanceState);
        setContentView(R.layout.activity_main);
        button=(Button)findViewById(R.id.button);
        textView=(TextView)findViewById(R.id.textView2);
        button.setOnClickListener(new View.OnClickListener() {
            @Override
            public void onClick(View v) {
                showMessage();
            }
        });
    }
    public void showMessage(){
        final AlertDialog.Builder builder=new AlertDialog.Builder(this);
        builder.setTitle("안내");
        builder.setMessage("종료하시겠습니까");
        builder.setIcon(android.R.drawable.ic_dialog_alert);
        builder.setNegativeButton("아니오"new DialogInterface.OnClickListener() {
            @Override
            public void onClick(DialogInterface dialog, int which) {
                Snackbar.make(textView,"아니오 버튼이 눌렸습니다.",Snackbar.LENGTH_LONG).show();
            }
        });
        builder.setPositiveButton("예"new DialogInterface.OnClickListener() {
            @Override
            public void onClick(DialogInterface dialog, int which) {
                Snackbar.make(button,"예 버튼이 눌렸습니다.",Snackbar.LENGTH_LONG).show();
            }
        });
        AlertDialog dialog=builder.create();
        dialog.show();
    }
}
cs

activity_main.xml

1
2
3
4
5
6
7
8
9
10
11
12
13
14
15
16
17
18
19
20
21
22
23
24
25
26
27
28
29
<?xml version="1.0" encoding="utf-8"?>
<android.support.constraint.ConstraintLayout
 xmlns:android="http://schemas.android.com/apk/res/android"
    xmlns:app="http://schemas.android.com/apk/res-auto"
    xmlns:tools="http://schemas.android.com/tools"
    android:layout_width="match_parent"
    android:layout_height="match_parent">
    <Button
        android:id="@+id/button"
        android:layout_width="wrap_content"
        android:layout_height="wrap_content"
        android:text="알림대화상자 띄우기"
        app:layout_constraintBottom_toBottomOf="parent"
        app:layout_constraintLeft_toLeftOf="parent"
        app:layout_constraintRight_toRightOf="parent"
        app:layout_constraintTop_toTopOf="parent" />
    <TextView
        android:id="@+id/textView2"
        android:layout_width="wrap_content"
        android:layout_height="wrap_content"
        android:layout_marginTop="116dp"
        android:text="알림대화상자"
        app:layout_constraintLeft_toLeftOf="parent"
        app:layout_constraintRight_toRightOf="parent"
        app:layout_constraintTop_toTopOf="parent" />
</android.support.constraint.ConstraintLayout>
cs

AdapterViewAdapter와 AdapterView란?

어댑터 뷰는 말 직역하면 적응형 뷰라는 의미가 된다. 앱들을 보면 같은 틀에 다른 내용들이 포함되어 여러개로 나열된 경우를 많이 보았을 것이다. (ex. 카카오톡 친구목록, 페이스북 게시글, Pinterest의 게시글 등) 여기서 사용되는 하나의 틀은 AdapterView로 정의하고 입력할 내용들과 방식은 Adapter로 정의하여 정보들을 원하는 방식으로 나열하여 표현 할 수 있다. 


사용방식

기본적으로 ListView나 GridView를 통해서 하나의 View씩 나열 할 수 있다. 또한 Custom View를 제작하여 AdapterView로 사용함으로써 자신이 원하는 틀을 제작할 수 있다. 실제 개발에서는 후자의 경우가 많이 사용될 것이므로 이에 대해서 설명하도록 하겠다.


개발방법 

(customView를 수직으로 나열하도록 개발)

  1. 먼저 res->layout에 AdapterView로 사용할 customVeiw.xml 파일을 생성한다

  2. 자신이 원하는 View구성을 위 파일에 입력한다.

  3. View들을 나열할 액티비티로 이동해서 ListView listview를 추가한다.

  4. 나열할 데이터들을 가져와 배열을 생성함

  5. ListView객체를 생성하고 미리 생성한 ListVeiw를 참조함

  6. Adapter를 생성함

    1. 데이터를 가지고 있는 ArrayList<HashMap<String,Object>> dataList를 생성함

    2. 배열 내부의 HashMap을 참조하기 위해 key값이 나열된 배열을 생성 -> String[] keys

    3. 위에서 생성한 AdapterView의 내부 View아이디를 참조하기 위한 id 배열생성 -> String[] id

      1. **중요** 나중에 keys, id 배열들의 값이 각각 일대일 대응되어 데이터가 저장되므로 순서가 중요함

    4. Adapter를 만들어 준다

      1. SimpleAdapter ad = new SimpleAdapter( this,  dataList, R.layout.customView, keys,id);

        (keys와 ids 내부의 배열들이 인덱스 0 부터 일대일 대응이 되고 keys 배열 순서에 따라 dataList의 하나의 해쉬맵에서 value가 참조되어 ids에  일대일 대응 되어 삽입이 된다.)
    5. Adapter를 세팅해준다.

      1. listview.setAdapter(ad);


+ Recent posts